homeaboutfreebiesportfoliocontact
Showing posts with label Paper. Show all posts

Thursday, February 20, 2014

Baby Shower Invitations Inspired by John Lennon's Animals

I'm very excited to share the printed version of the baby shower invitations I mentioned last week!

Here are some pictures


The mom-to-be is actually my cousin, and she has the John Lennon Real Love nursery collection that came out about 10 years ago, all in perfect condition. She and her husband, my cousin Darren, are big Beatles fans, so this nursery stuff really fits them to a T! I wanted to incorporate something about it into these invitations so they would be extra special to them, so I re-drew the animals that John Lennon drew for his son (named Julian!), which are part of the nursery bedding. You can see what some of the nursery pieces look like here. 

The animals are a pretty loose interpretation because I didn't want to copy them, but I think they came out so cute!

These invitations are stunning in person. The colors are so amazing, I can't even get over it! And they were definitely a labor of love because I cut all of my prints myself, and there were about 75 invitations here... Imagine me hunched over my paper cutter for about an hour with squinty little eyes. So cute.

Congrats to Darren and Cathy! I can't wait to meet the little guy!

Tuesday, February 11, 2014

Projects, Projects!

After Christmas I didn't have much going on in terms of design work, and with planning a move and all of the other things we had going on, I'm sort of glad that I had a break. Now I'm back at it with all types of work. Some projects have been self-initiated, which are usually my favorite ones, and some are for clients, which really puts the pressure on!

This is a little project that is a gift for my cousin who just had a baby earlier this month. It's one of my favorite birth announcement designs so far, and it happened to match her nursery really well.


These pictures were taken at night so the lighting in my apartment wasn't great!! I'm definitely going to take better pictures for my design portfolio.

This next project was self-initiated because I want to better my web design skills, and my mom is a florist who doesn't have a website. It's so important to have a website as a business owner, and my mom doesn't really understand that or value that, so I'm taking control of it and just doing it for her! I've been using Webydo to create the site, and so far I've had a decent experience. There are some kinks that have slowed me down but it's like any software that you've never worked with before- you just have to get used to it. I'll probably write more about my experience when Im all done!

So this is the new logo and color scheme that I've dreamed up that works with the colors that my mom already has going on in her shop. I plan on expanding the whole brand into new business cards for her that will include her new website address.


So far I only have a few pages that are "done" and the rest of it will be slow moving because I have to take pictures to use as content for each of the pages. Hopefully I can get most of the content I need to get it running within the next month, and then I'll be able to add things as I go and as the seasons pass and my mom puts out more work.

The next thing that I have in the works is a baby shower invitation for my cousin Cathy, who is expecting a baby boy in April. I'm just waiting to hear that the details are definite and also a count of how many to print.

Cathy has baby bedding from Carter's that is based on the animals that John Lennon drew in his book for his son (fun fact: John Lennon's son's name is Julian!). She bought it when she worked there ten years ago and has saved it all this time. Cathy and Darren (who is my second cousin) are huge Beatles fans, so the bedding is really special to them. I wanted to include something that was very them in the design for the invitations, so I recreated the animals in the bedding to put in the banner at the top of the invitation. I can't wait to get these printed! They're one of my favorite invitations that I've done so far!


This next project was proposed by an old friend who I met at my first job. She wants to start a tea beverage business and came to me asking for a little bit of branding work. So I got to work right away drawing up a logo and thinking of the color scheme. I can't wait to show her what I've come up with so far! 


The challenge here is going to be translating my handwritten logo into something digital. I've started to draw it on my computer and it's not perfect yet. It'll take lots of work to get it looking the way it need to look. Here are the colors I'm thinking so far, and a little pattern that could be used somehow.


I can't wait to see how it pans out!

This last thing was something I did in my spare time last week while I was still without wifi. I plan to have it printed (although I haven' decided what size) and framed for Julian's room. I originally planned to make a huge print of it but since I have the painted fox in there now that I want to be the focal point, this guy might be a little smaller, but equally as important of course.

This guy is so graphic and awesome. I want one for my room! I love art like this because it's so interpretive and the types of colors you include really communicate the personality of the character that you create. This fox is really sassy and really has his own set of rules, which is exactly how Julian is. Sassy and headstrong!

When I'm looking back at all of these projects I can't believe how many different things I'm doing right now. Babies, tea branding, foxes, flowers... holy cow! I love how each project is so different than the next. Some are more in depth and complicated, some are completed and some are a work in progress. I love having work to do. It motivates me to be creative and productive, especially at night, when Julian has gone to bed and all I feel like doing is watching Treehouse Masters. Yeah, totally my new favorite show. I'm serious.

I hope to be able to add all of these things to my portfolio soon! Thank you to everyone who supports my talents and my dreams and my crazy obsessions. Every new thing I take on is an opportunity to learn something new.

Wednesday, December 11, 2013

Printable Holiday Gift Tags

I talked earlier today about holiday gift wrapping and more particularly gave some links to my favorite free holiday gift tag printables. I primised you guys some gift tags created by me, so here they are!


I made two versions of these tags- one is all black, in case you don't have color ink or might have to print them on a black ink printer at work (I won't tell!), and the other has various neutral brown tones. Both would look amazing against red or gold solid wrapping paper!

Click here to download the neutral brown tags.
Click here to download the black tags.

I hope these are useful to you! As I mentioned in my earlier post, printable gift tags are great for those last minute wrapping sessions, when you usually start to run out of supplies. All you have to do is Pin these tags now so you will have them to download and print later!


Saturday, November 16, 2013

Elmo Second Birthday Invitations

I'm excited to share a little project that I've been working on recently for a friend. When she told me she was planning an Elmo themed birthday party, I was a little nervous because that's sort of not my "style". But, a really great idea came to my head that would make them extra special. I also didn't want to use the predictable Sesame Street/kid fonts, so I paired our friend Elmo with Origin and Honey Script.


Saturday, August 24, 2013

Free Gatsby Soiree Printable!

Good morning! I spent some time last night fiddling around on the computer and pinning some new inspiration for new projects, and I came across a recent pin from Oh Happy Day's printable cocktail party invitations. Everyone loves a free printable! So, I made this Great Gatsby themed birthday soiree printable for you to use to invite to your next party! You could base the whole party on this art-deco theme, and even have your guests come in their most dapper dressings!


Simply print the invitations, fill in the information and give them out to your guests- they should fit in an envelope for 4x6 invitations, which can be found at your local craft store, or even Staples.


Materials:
White, cardstock paper (8 1/2x11)
This downloaded PDF file (A new page will open- click the "Download" button in the upper right hand corner- I promise it's safe!)

Steps:

  1. Download the file.
  2. Open it up on your computer.
  3. Print it out on the cardstock paper.
  4. Cut the invitations out.
  5. Fill in the party information.
  6. Send them out.
  7. Host a fabulous party!


It's so easy! You could throw something together in no time with these printables, and they're perfect for a small get-together. if you wanted to make the invitations a little glitzier, you could easily add some glitter glue and trace along a few of the gold scallops to make them really pop.


Wednesday, August 14, 2013

My Etsy Shop & Giveaway!

Banner1
Besides having recently started this blog, I am also relatively new on Etsy, too! I started my shop, The Littlest Print Shop last month, and I won’t lie- I expected it to take off quicker than it has. I’ve scoured the internet and Pinterest for tips and advice on creating a super successful shop, and I feel like I’ve followed the steps as best as I can! I’ve put myself out there on all the social media platforms that I have, and even approached women that fall into my target audience, and offered them coupon codes- and nothing! Sometimes not even so much as an “Ok, thanks!”
Darn you Facebook messenger for allowing me to see that someone has seen my message and just doesn’t want to reply.
I even went the extra mile and had these super cute business cards printed, so I could hand them out to the women I know through work.
         photo 1        photo 2
Ok, so I’ll stop whining now and get on to more about my shop! I’ve been creating my own invitations and announcements for awhile now (my first was an invitation to my graduation party, and I’m embarrassed that I thought they were the bees knees), and people are always commending me for my talent and saying how great my work is. With some prods and words of encouragement from a few people- namely my Aunt Jen on one or two occasions- I opened up shop. I have no real experience with photography, and especially not product photography. It’s pretty difficult to take interesting pictures of pieces of paper, so I established the signature style of having the wood of my kitchen table as the backgrounds to my products.
5x5LoveBirdsEngagement5x7GiraffeBirthAnnouncement5x7LittleManPrintedMustache5x8BirthAnnouncement
When it came to pricing my products, I looked at similar items on Etsy that were big sellers. For now I’m offering the actual, printed invitations, and not digital files, so that’s what I looked at prices of. I also checked out Shutterfly and Tinyprints to see what they charge per invitation/announcement/card. Once I had my price per card, I figured in the time it would take me to edit a customized piece, and tacked that on. I estimated the cost of adding envelopes, and then I had my price. To me, it seems extremely fair, considering I’m not charging for shipping! Since I’m also a newbie, I didn’t feel right about charging an arm and a leg for my items. If the price doesn’t seem right, or I find that I’m not actually making anything, once I start selling, then I can reevaluate.
So, with all this information, I’d love to hear from any Etsy sellers, or even freelancers or non-virtual shop owners! What am I doing right and what am I doing wrong, and am I just impatient?!
I’m itching for a sale- not for the money, but for the excitement of having my work “out there”.
Giveaway
Lucky for you guys, I’m giving away 20 FREE Invitations or Announcements of your choice from my shop! This offer excludes envelopes, but does include shipping to wherever you are, within the US. All you have to do is:
  • Comment on this post saying “I Love Etsy”
  • Tell me if you’ve ever purchased from Etsy and if so, what did you like about that experience?
  • Your email address
Because I’m not sure how large my readership is right now, I’ll keep this giveaway open until there are 10 comments on it. Once there are 10 comments, I’ll randomly select a winner. The winner will then be emailed by me and we can talk about your order from there!
Feel free to check out my shop before you enter this giveaway!

Sunday, August 4, 2013

DIY Block Printed Notepad

I was dabbling in some artsy things last night, and I decided to carve a new linoleum stamp and print some blank cards that I've had laying around in my craft stash. Block printing is something I'm fairly inexperienced with, but something I really love doing, and it's really one of the forms of art that I practice that actually make me feel like an artist. I consider myself a learning graphic designer, which is a genre of art that is usually created on a computer, and it's hard to feel "artsy" when you're not really getting your hands dirty, or having to clean up your workspace at the end of a project. (Cleaning brushes and tables, letting things dry, ect.) So, I do some block printing from time to time.

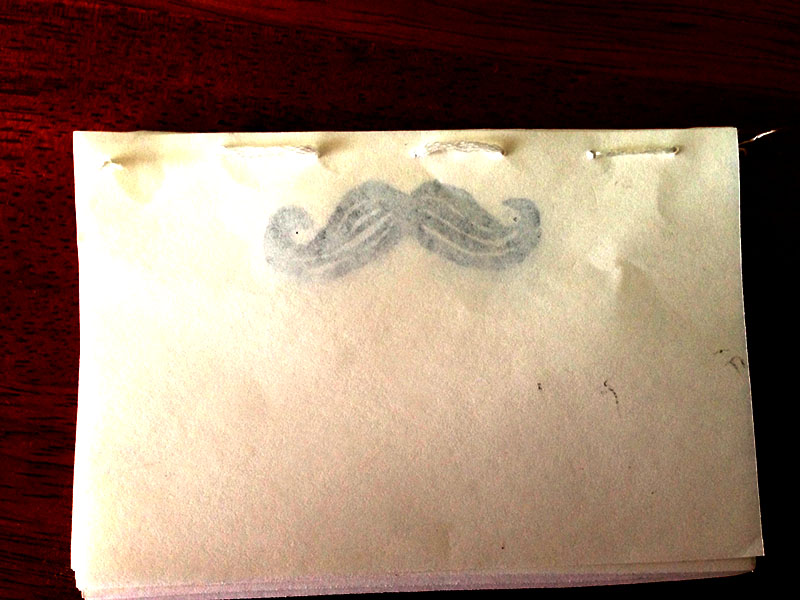
For Julian's first birthday, which was mustache themed, I carved a mustache stamp to possibly use for favors and decorations. Block printing isn't like buying a rubber stamp from AC Moore and a pretty ink pad, and stamping around on some paper. It's rolling out your oil based ink, rolling the ink on your hand-carved linoleum stamp, stamping it on your paper by hand, rubbing the stamp with a brayer, and peeling the stamp off and hoping it came out the way you wanted. And repeat. For every print. Because of this process, I didn't use the mustache stamp in the capacity that I would have liked to. But, I made this simple notepad out of some pieces of paper and some embroidery string last night/today that I'd like to share as my first project on the blog!


(I promise I'm done rambling for today)

Materials Needed:


Some of those materials will make you turn around and chalk this up as another thing that's too involved for your taste, but it's really a quicker process that you think, and it doesn't have to be expensive. The materials you buy for block printing will last you forever if you treat them right and use them moderately. Lucky for me, I have an art teacher/friend that gave me some starter materials. Hi Mrs. Parkman!

First, you'll want to carve your linoleum into the shape of your choosing. Anything would work- a symbol, a logo (with some practice), your initials. There's a good tutorial on carving your linoleum here. It's pretty self explanatory though!

Once your block is done, you can test it out to see if you need to change it or carve deeper in any areas.

Then, you can cut your paper into the size that you want your notepad to be. I folded and cut my paper in half four times to get the size I made, and it's perfect for a little list! Once your paper is cut, print your design onto it wherever your heart desires, and then set each piece to dry. I let mine dry overnight, because even when it feels dry, the ink can still be really tacky.

I printed about 30 pieces for my notpad, but you can do any amount that you want. This would even be a good idea for a mini journal!

Once your pieces are dry, you can begin to assemble them!


I made a little template for poking the holes in the paper to bind the notepad, so that the holes would be easy to thread. Taking your piece of scrap paper (I used a long coupon I'll probably never use), fold it in half to create an edge to line your paper up on. Then mark where your holes will go (how far apart and how deep into the paper). I cut the top of the back of this scrap paper, so I'd be able to poke all the way through my pages to make the holes big enough. The front of my template looked like this:


Fancy, I know. This is the template with the first few pages in it, and opened up. See how I cute the back off, but kept enough to be able to line the pages up?


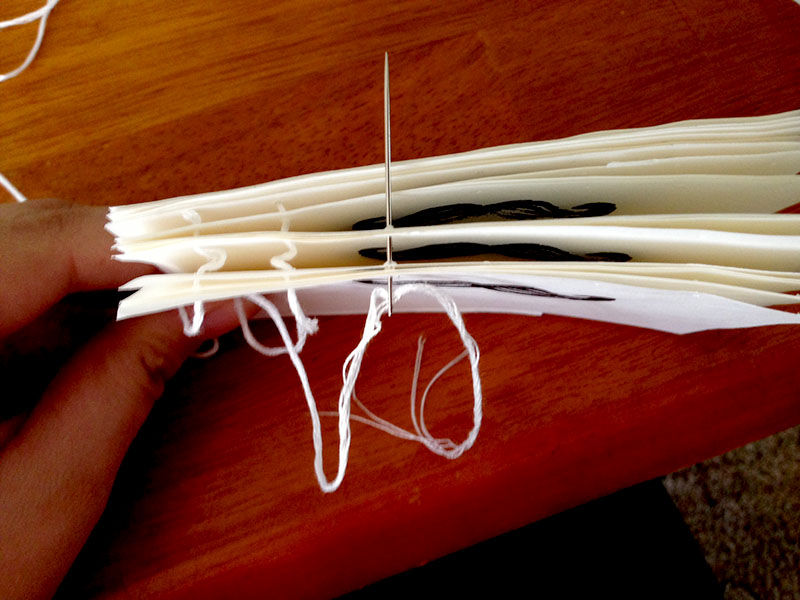
 Now it's time to poke some holes! Making sure all of your paper is lined up nicely, you can poke through the scrap paper and your first few pages, pulling the embroidery needle all the way through the pages.


You could probably cut your steps in half by pulling the thread and the needle through the pages and the scrap in this step, but I separated the steps so I could eliminate the possibility of messing my holes up and having to start over again with the threading part.

Once all of your pages have nice holes in them, you can go through again with the needle and thread.


I found as I went that it was best to group all the pages together, but pull the needle and thread through a few pages at a time. Pulling the thread through was a little more difficult than just the needle. This is where it comes in handy to have pre-poked holes, so you can be sure everything is aligned nicely.


I wish I had a more exciting color of thread on hand, but my pack of red got all tangled in my last project, so I only had white. It would be super cute in a neon pink or blue, or even red!

Once your pages are threaded together, you can pull it tightly and tie off each end and snip them down so they're not visible.


And then you have a nice little book or notepad! This is the most simple binding you could do, but with a bigger needle you could really get fancy with it and go back through to create a really secure binding. Since I might be tearing off these pages as I use them, I didn't want my paper to be too thick, or my binding to be too tight.


I hope you had a happy weekend! Hopefully we will start having some summer weather (gasp!) here in Central New York so I can actually do some summer activities (gasp!)!