homeaboutfreebiesportfoliocontact
Showing posts with label DIY. Show all posts

Saturday, December 21, 2013

Block Printed Fabric

Hello! I've been brainstorming some REALLY last minute gifts that I can give to some of my family members, and last weekend I went to Old Navy while they were having a huge sale and picked up lots of great stuff! I love their accessories because they're usually inexpensive but so cute! I saw some scarves on sale for less than $10 and figured that it would be used or gifted somehow, so why not buy it. I chose a plain white one with the thought of using one of my [many] linoleum stamps.


I thought about what I wanted to do with the scarf, and initially I thought it would be a good idea to use fabric paint so that if it got wet the color wouldn't run. But when I put the paint on the linoleum stamp I was using, I realized the paint was too runny and my print would just come out like a big blob. If you were doing something like a circle or triangles (which would both be so cute!) it might work ok, but my stamp has grooves in it.


I ended up just using my Speedball water soluable block printing ink in gold, so it'll be interesting to see what happens if the scarf gets wet.

I started out by laying the scarf on top of a canvas dropcloth. (Which was previously a curtain in my living room. It was time for a change.) My scarf was pretty wrinkly so I did iron it before starting.


Then I rolled out my ink onto the stamp that I chose to use, and began stamping in a line down the scarf. This scarf had a nice border around it so I left a little room in between the row and the border. Then you just continue through the whole scarf, evenly placing the stamp as best as you can. I placed every other row diagonally to the one next to it, so I wouldn't have rows of patterns. This way it looks like one big pattern, rather than rows of chevron. You can get fancy with it and do different stamps and different rows. The possibilities are really endless.


The best part about this scarf is that because it's square, it doesn't even have to be a scarf. I might use it on Monday for a Christmas brunch I'm hosting for Dom's mom as a table runner. It's sort of an awkward scarf because it's square. It looks like it's swallowing my neck and head because it's so big.


Printing on fabric is so so easy, and you can use it for anything. You could look through the clearance fabric at JoAnne's or Hobby Lobby and turn it into something amazing! And you don't even have to do a block printed design. You could make a stamp out of a potato! Then you could use your fabric for a whole slew of things; decorative pillows, scarves, table runners, tapestries, curtains, clothing, tea towels...

Get my drift?

So if there are any gifts that you still have to buy, consider making it instead! Home made gifts are especially great if you have a tiny budget but want to give an amazing gift. The fact that you put your own thought and work into something is worth a million bucks in my book.

Good luck with the last of your gift buying! Dom and I went out today and I have to say, the stores are wrought with Christmas shopping frenzy. Get out there while you can!

I can't wait to share my Christmas brunch with you on Monday!

Wednesday, December 4, 2013

DIY Glitter Vial Necklace

I love giving everyone a gift for Christmas. I love the looks on peoples' faces when I hand them their gift and they didn't expect to get one from me. It's such an amazing feeling. Unfortunately, getting everyone a top-notch, amazing gift isn't in my budget, especially this year. I dont think I planned very well... the holidays always creep up on me!

But, I thought of this cute little gift idea that would be perfect for little cousins, a niece (or nephew!), or even a friend that might appreciate something fun and whimsical. So, without further ado...


This project took me about 20 minutes and all the supplies cost less than $15 (and even less than that if you already have ribbon and glitter, which I did), so this is something that's easy for even the least crafty gifter. The idea behind this necklace is that the glitter could be magical, or fairy dust, which I think a little kid would be so excited about. I know my little cousins and niece will enjoy it, and I even have a friend in mind that will enjoy wearing it out as a "statement" necklace. It's definitely a conversation piece!

The supplies you need for this project are:
  • 1 package of corked vials (I got mine at A.C. Moore in the scrapbook section)
  • Glitter in the color of your choice
  • Hot glue gun & glue (optional)
  • Ribbon, string, or necklace chain (depending on the look you're going for)
  • Piece of scrap paper & tape
You'll need to make a very small funnel to easily guide the glitter into theopening of the vial, and for this I used a piece of scrap paper that I rolled into a cone shape with a very small tip for the glitter to slide through. I secured it with tape so it wouldn't move around on me.


Then, you can open your package of vials and select the ones that you want to use. Some of them were a little bigger than I wanted for my necklaces. This is the brand that was at A.C. Moore.


Next, you can start filling your vials with glitter. You can put as much or as little in there as you'd like, but keep in mind that you need to leave a little space to fit the cork back into the opening.


Once your vials are filled, you can put the corks in. Some of the corks fit into the opening of the vials enough to not fall out, but some of them didn't feel as secure- and you don't want to lose your magic! To secure those corks, I just put a little bit of hot glue around the cork.


I originally pictured the vials hung on some sort of dainty metal chain, but my sister persuaded me that some thin ribbon would serve the purpose. 

Cut the ribbon to the length of your choice, and tie the two ends together with about an inch on each end to spare, so that you can wrap them around the neck of the vial. Wrap the ends around the vial and secure them with tiny dots of hot glue. If you don't have hot glue, you could leave extra room to tie the ends in a knot.

They would also look pretty with thicker ribbon and a cute little bow around the neck of the vial!


It's hard to tell what's going on in the picture, but I promise it's easy!

The end result is so cute, and perfect as a quick little gift that a little kid wil definitely be excited to wear! And, it's very cost-effective because you get a few out of just one set of supplies. And you'll have glitter on hand now, which is an important addition to every crafter's collection.


What Christmas quickie gifts are you making or giving this season? If you have any tutorials on your blog, I would love to see them! Post a link in the comments below!


Monday, November 11, 2013

DIY Temporary Wall Decor


Our apartment isn't the most beautiful thing. Nice apartments are sort of hard to come by in Auburn, and this is our first one, so we sort of took one of the first ones we looked at when we were hunting, just because we were both excited to be out on our own together. Hopefully this spring we can start looking for a place that's more long term.


There is this wall in the kitchen area that drives me nuts. We used to have a little clock that I hated, and then it ran out of batteries and just got taken down. Then I just had a cute apron hanging from a nail (embarassing...). We could really use more storage for small appliances (we have a little deep frier that currently lives on the dining table when inactive) and my array of platters and serving dishwear. I love the look of industrial open shelving, but I don't think that fits the current aesthetic of our place, so hopefully next time we can go that route.

I love the look of wallpaper and patterned walls, so I've been gathering some ideas (one, two) that could be more temporary for our place, went out and bought some supplies, and went to town!

I went to A.C. Moore last night and picked up 6 large pieces of metallic gold scrapbook paper and a package of the non-permanent Glue Dots that don't leave residue and remove easily. (With their sale on the paper and Glue Dots, it came out to less than $7) I used the base of a plastic kids cup to draw 16 circles on the back of the paper, and then I cut them all out. It was a nice sitting-on-the-couch-watching-Revenge activity.


I knew I didn't want a super pattern-y look, and I liked the way reference two had that bursting look, so I sort of went by that. I started in the upper left corner with closer together dots and gradually moved them father apart, moving down and outwards on the wall. I didn't go all the way to the bottom because I knew it would be too enticing for little hands. I bet they would look amazing going all the way to the floor!


 The wall in our kitchen turns into this narrow wall that's really awkward, but a good place for Julian's high chair, and I never really bought a mirror or anything for it. So, I continued my dots along that wall and it looks great!

If I had the patience to cut out more circles, I would go buy more paper and continue the dots all along the other 2 kicthen walls. And looking at the pictures above, they don't look as nicely distributed as they do in person.

This is such a fun update, and it's perfect for you renters (or white wall lovers looking for a pop) because they really are temporary- I took one off the wall to move it over and it came off super easy- and a great update if you can't paint. The window in the kitchen catches the metallic paper and makes some of the dots shine so nicely! Julian came out of his room this morning pointing and clapping at them, saying "OoooooooohHH!"

So far he hasn't harassed a single dot. So far.

Have you added a temporary wall decoration lately? Have you come across any other inspiration somewhere? I think I'm addicted, so stay tuned for another edition of Temporary Wall Art!

Friday, October 4, 2013

Photoshop Filter Fun


I'll admit it- I use Instagram and my iPhone a lot to take pictures. What could be more convenient than taking pictures with the one object that you always have with you? And what's better than convenience is quality. Sure, nothing beats a big 'ole DSLR on Manual, but for most everyday shots, iPhone does the trick. And with Instagram, who needs Photoshop? The good news: we can all be "photographers". The bad news: sometimes the premade Insta photo filters don't give you what you need.

By taking a photo and putting it into Photoshop and making a few quick changes, you can not only have great looking pictures, but they don't have to be square, and you can control the options!

Everyone loves a good, simple photoshop filter! So here I am to give you one. I'm going to play around with them a little more to bring a few different ones here for you guys. (Or probably gals.)

Behold: my beautiful baby. Who has been less than an angel this week due to a fever, being lethargic, and super cranky. Lets hope all he needs is a restful weekend.

Anyways.


Ok, so my photography skills (or was this taken by my sister...) aren't great. We were on our way out for a walk so the backdrop is less than to be desired. But those eyes!!

Here are the steps I took to go from "Before" to "After". Feel free to change numbers liberally to find the right settings for your image.
  1. Open your image and do any necessary preliminary edits (retouching, a little lightening, ect). Keep in mind that we will be editing Levels throughout this, so don't go crazy at the start.
  2. Select "New Adjustment Layer" from your Layers dropdown menu. Put your cursor on "Levels". On the menu that appears, you'll want to select where it says "RGB" and change that option to "Blue". Slide the Black Output Level arrow to the right until you're happy with the amount of Blue. I have it around 60 in the image above.
  3. Next, select "New Fill Layer" from the Layers menu. You'll click Ok, and then the color picker will appear. For the purpose of this tutorial, we're going to fill it with an almost-white pink color. The code for the color I used is #feeaea.
  4. WOAH your image disappeared. That's ok. With your fill layer still selected, you'll select "Multiply" from the drop down menu in your Layers window on the right side of the screen. Now you have a nice, rosy color over the whole image.
  5. Select "New Adjustment Layer" again from your Layers drop down menu, and this time click "Curves". This is going to adjust some exposure in the image, so if you have one that's already super exposed, you could consider skipping this step. This step is all about preference, so you'll have to play with the curve to get the look you want. Keep in mind that moving the line to the left will saturate/expose the image, while moving it to the right will desaturate/dull the image. I clicked the line about 1/2 of the way up and moved it slightly left, since my image was exposed to begin with.
  6. Lastly, we're going to add another "Adjustment Layer", click "Levels", and set "RGB" to "Green". Change your black Output arrow to somewhere around 50 (depending on preference).
  7. Flatten your image when you're happy with your results, "Save for Web", and Facebook away!


Your friends will be jealous of your Instagram-like abilities, and even more impressed when you told them you did it in Photoshop!

Good luck in your future Filter endeavors, and look for more Filter Fun coming soon! And, don't forget to Pin this if it was helpful for you!

Saturday, August 24, 2013

Free Gatsby Soiree Printable!

Good morning! I spent some time last night fiddling around on the computer and pinning some new inspiration for new projects, and I came across a recent pin from Oh Happy Day's printable cocktail party invitations. Everyone loves a free printable! So, I made this Great Gatsby themed birthday soiree printable for you to use to invite to your next party! You could base the whole party on this art-deco theme, and even have your guests come in their most dapper dressings!


Simply print the invitations, fill in the information and give them out to your guests- they should fit in an envelope for 4x6 invitations, which can be found at your local craft store, or even Staples.


Materials:
White, cardstock paper (8 1/2x11)
This downloaded PDF file (A new page will open- click the "Download" button in the upper right hand corner- I promise it's safe!)

Steps:

  1. Download the file.
  2. Open it up on your computer.
  3. Print it out on the cardstock paper.
  4. Cut the invitations out.
  5. Fill in the party information.
  6. Send them out.
  7. Host a fabulous party!


It's so easy! You could throw something together in no time with these printables, and they're perfect for a small get-together. if you wanted to make the invitations a little glitzier, you could easily add some glitter glue and trace along a few of the gold scallops to make them really pop.


Friday, August 9, 2013

Weekend Project Obsessions: Bar Carts

So, I wanted to get an idea for a weekly post, and I'm always looking for fun projects to tackle over the weekends, so I'll share my most recent Pinterest obsession: Bar Carts!

My love for bar carts really started a few months ago when I began watching Mad Men on Netflix (it only took me 2 months to finish every episode on Netflix- crazy much?), and noticed that there were bar carts and alcohol in almost every scene. I'm not a drinker (under 21 and not a fan of the taste), but I love the idea of having one, especially for parties or Friday night gatherings. Here are some inspirational pictures that I've collected via Pinterest:


Emily's distressed version from her house tour at The Everygirl.


The moment I fell in love with a bar cart was when I first saw this one from Danielle's blog, Breakfast at Toast!


A great mood board of sorts about stocking your basic bar cart from For Chic Sake.


This really basic and beautiful vintage bar cart refab is by Monica at Living in Vogue.


I love this closeup of Kristen's fun and sophisticated bar cart- especially the straws!


I've had my eye on a bar cart similar to Monica's bar cart at my local thrift store that I thought was way too worn to be turned into something that looked expensive and sophisticated. But when I saw her before picture, it made me think I could do it! Sometimes I forget how far some cans of spray paint can go... I might be stopping to pick mine up after work- I just hope it hasn't been scooped up before I get there!

I'm hoping to also take a trip to downtown Syracuse and check out Goodwill and Hobby Lobby for some retail therapy after a semi-stressful week. I've never been to either of those places, and after reading about so many projects that began with a good find at one of them I'm dying to see what all the fuss is about! Wish me luck!

Are there any furniture trends you're loving right now? Are you loving bar carts for their functionality or just their look, like I am?

Happy Friday!! Drink responsibly!


Sunday, August 4, 2013

DIY Block Printed Notepad

I was dabbling in some artsy things last night, and I decided to carve a new linoleum stamp and print some blank cards that I've had laying around in my craft stash. Block printing is something I'm fairly inexperienced with, but something I really love doing, and it's really one of the forms of art that I practice that actually make me feel like an artist. I consider myself a learning graphic designer, which is a genre of art that is usually created on a computer, and it's hard to feel "artsy" when you're not really getting your hands dirty, or having to clean up your workspace at the end of a project. (Cleaning brushes and tables, letting things dry, ect.) So, I do some block printing from time to time.

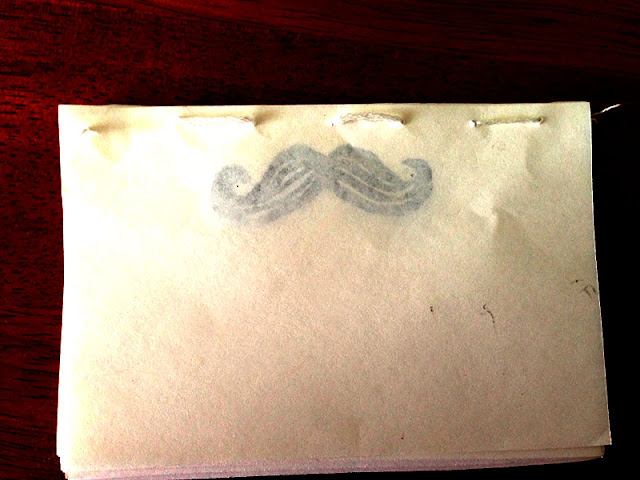
For Julian's first birthday, which was mustache themed, I carved a mustache stamp to possibly use for favors and decorations. Block printing isn't like buying a rubber stamp from AC Moore and a pretty ink pad, and stamping around on some paper. It's rolling out your oil based ink, rolling the ink on your hand-carved linoleum stamp, stamping it on your paper by hand, rubbing the stamp with a brayer, and peeling the stamp off and hoping it came out the way you wanted. And repeat. For every print. Because of this process, I didn't use the mustache stamp in the capacity that I would have liked to. But, I made this simple notepad out of some pieces of paper and some embroidery string last night/today that I'd like to share as my first project on the blog!


(I promise I'm done rambling for today)

Materials Needed:


Some of those materials will make you turn around and chalk this up as another thing that's too involved for your taste, but it's really a quicker process that you think, and it doesn't have to be expensive. The materials you buy for block printing will last you forever if you treat them right and use them moderately. Lucky for me, I have an art teacher/friend that gave me some starter materials. Hi Mrs. Parkman!

First, you'll want to carve your linoleum into the shape of your choosing. Anything would work- a symbol, a logo (with some practice), your initials. There's a good tutorial on carving your linoleum here. It's pretty self explanatory though!

Once your block is done, you can test it out to see if you need to change it or carve deeper in any areas.

Then, you can cut your paper into the size that you want your notepad to be. I folded and cut my paper in half four times to get the size I made, and it's perfect for a little list! Once your paper is cut, print your design onto it wherever your heart desires, and then set each piece to dry. I let mine dry overnight, because even when it feels dry, the ink can still be really tacky.

I printed about 30 pieces for my notpad, but you can do any amount that you want. This would even be a good idea for a mini journal!

Once your pieces are dry, you can begin to assemble them!


I made a little template for poking the holes in the paper to bind the notepad, so that the holes would be easy to thread. Taking your piece of scrap paper (I used a long coupon I'll probably never use), fold it in half to create an edge to line your paper up on. Then mark where your holes will go (how far apart and how deep into the paper). I cut the top of the back of this scrap paper, so I'd be able to poke all the way through my pages to make the holes big enough. The front of my template looked like this:


Fancy, I know. This is the template with the first few pages in it, and opened up. See how I cute the back off, but kept enough to be able to line the pages up?


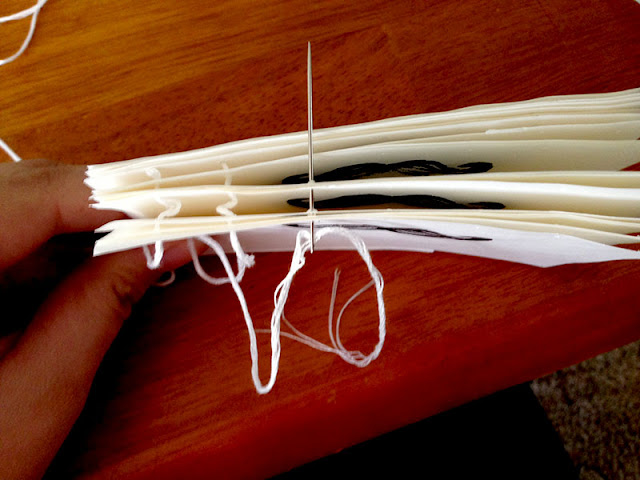
 Now it's time to poke some holes! Making sure all of your paper is lined up nicely, you can poke through the scrap paper and your first few pages, pulling the embroidery needle all the way through the pages.


You could probably cut your steps in half by pulling the thread and the needle through the pages and the scrap in this step, but I separated the steps so I could eliminate the possibility of messing my holes up and having to start over again with the threading part.

Once all of your pages have nice holes in them, you can go through again with the needle and thread.


I found as I went that it was best to group all the pages together, but pull the needle and thread through a few pages at a time. Pulling the thread through was a little more difficult than just the needle. This is where it comes in handy to have pre-poked holes, so you can be sure everything is aligned nicely.


I wish I had a more exciting color of thread on hand, but my pack of red got all tangled in my last project, so I only had white. It would be super cute in a neon pink or blue, or even red!

Once your pages are threaded together, you can pull it tightly and tie off each end and snip them down so they're not visible.


And then you have a nice little book or notepad! This is the most simple binding you could do, but with a bigger needle you could really get fancy with it and go back through to create a really secure binding. Since I might be tearing off these pages as I use them, I didn't want my paper to be too thick, or my binding to be too tight.


I hope you had a happy weekend! Hopefully we will start having some summer weather (gasp!) here in Central New York so I can actually do some summer activities (gasp!)!